AlgoWay Blog
Main clusters and core pages.
Core
- All articles
- FAQ
- PineConnector alternative
- TradersPost alternative
- Automate TradingView alerts
- Automate Telegram signals
- AlgoWay CopyTrader
- cTrader Copier
- Trendspider with AlgoWay
JSON & Alerts
- JSON schema
- Manual alerts
- TradingView without paid subscription
- AlgoWay Strategy Integration in Pine Script
- TRALADAL — TradingView Alert Adapter
MT5 / Expert Advisors
Errors
Integrations
- MetaTrader 5
- TradeLocker
- Match-Trader
- DxTrade
- Binance
- ByBit
- MEXC
- OKX
- Bitget
- BingX
- Alpaca
- Interactive Brokers
- GateIO
- CoinBase
- ProjectX
- cTrader logic
Other Publications
How to Connect TradingView Alerts to Gate.io with AlgoWay Webhook Automation
AlgoWay shows you how to connect TradingView alerts to Gate.io through webhook automation. You create a Gate.io API v4 key, add the credentials to an AlgoWay Gate.io webhook, paste the AlgoWay webhook URL into TradingView, and send a structured JSON alert message. When TradingView triggers the alert, AlgoWay receives the webhook and routes the command to Gate.io.
This guide is written for traders searching for how to connect TradingView to Gate.io, TradingView to Gate.io webhook, Gate.io automated trading, Gate.io trading bot webhook, and crypto trading automation with TradingView alerts.
The complete route is:
TradingView alert → AlgoWay webhook → Gate.io API v4 → Gate.io futures or spot executionTradingView creates the signal. AlgoWay receives and validates the webhook JSON. Gate.io receives the execution request through the API credentials that you configure in AlgoWay.
What AlgoWay Does in a Gate.io Automation Setup
Gate.io is the exchange. TradingView is the signal source. AlgoWay is the webhook automation layer between them.
With an AlgoWay Gate.io webhook, you can:
- receive TradingView webhook alerts;
- route TradingView strategy signals to Gate.io;
- send futures or perpetual orders according to your webhook configuration;
- use API v4 credentials with Gate.io trading permissions;
- test the webhook from the AlgoWay dashboard before using a real TradingView alert;
- inspect received payloads and execution responses in webhook logs;
- avoid building your own webhook server and Gate.io API connector.
AlgoWay does not create a profitable trading strategy. It provides the execution bridge after your strategy, indicator, or manual TradingView alert sends the command.
TradingView to Gate.io: How the Webhook Flow Works
A TradingView alert can send a webhook request to an external URL. AlgoWay gives you that URL for your Gate.io webhook. The alert message should be valid JSON with fields such as platform, ticker, order size, order action, and optional execution parameters.
- TradingView triggers an alert from a strategy, indicator, or manual condition.
- TradingView webhook sends the message to the AlgoWay webhook URL.
- AlgoWay reads the JSON and maps the order to your Gate.io webhook.
- Gate.io receives the order request through API v4.
- AlgoWay logs show the received payload and the platform response.
This makes AlgoWay a no-code TradingView to Gate.io connector for automated crypto trading.
Before You Start
Prepare the following before creating the Gate.io webhook:
- an AlgoWay account;
- a Gate.io account with API key access;
- a Gate.io Fund Password;
- Google Authenticator or the security method required by Gate.io;
- the AlgoWay IP address shown in your dashboard, if IP binding is required;
- a TradingView strategy, indicator, or manual alert;
- a valid JSON alert message for AlgoWay.
Important: Gate.io may require a Fund Password before you can create an API key. This is not the same as your login password. If you have not created it yet, open Gate.io account security settings and set the Fund Password first.
During API key creation, Gate.io can ask for the Fund Password and Google Authenticator code before showing the API key and secret.
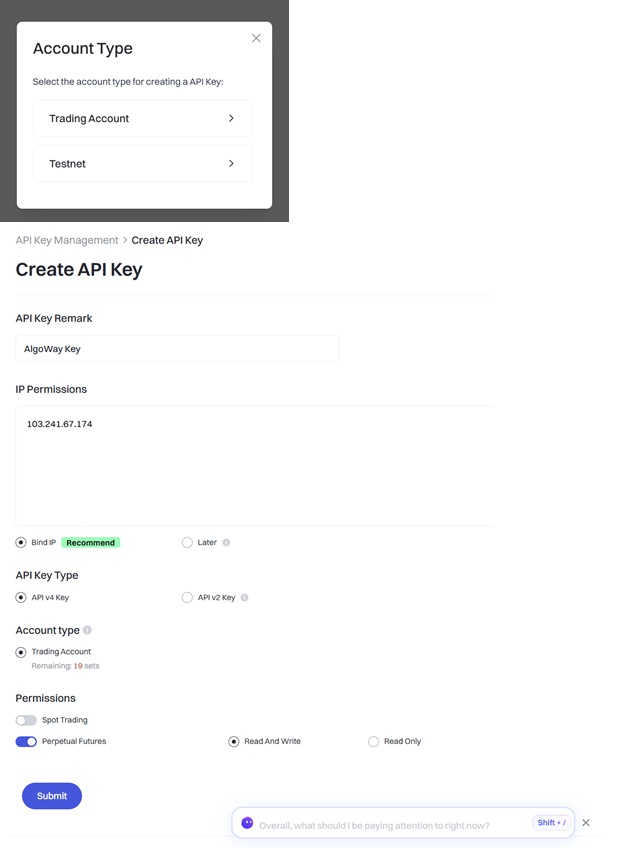
Step 1. Create a Gate.io API v4 Key
Log in to Gate.io, open API Key Management, and create a dedicated API key for AlgoWay. Use a clear name such as AlgoWay Key so that you can identify this integration later.
- Open API Key Management.
- Click Create API Key.
- Select Trading Account.
- Enter an API key remark, for example
AlgoWay Key. - In IP Permissions, enter the IP address required by AlgoWay.
- Select Bind IP if your setup requires IP restriction.
- Select API v4 Key.
- Enable the required trading permission, such as Perpetual Futures.
- Select Read And Write.
- Click Submit.
Gate.io API v4 keys can be created with multiple permissions, so use only the permissions required for your trading route.
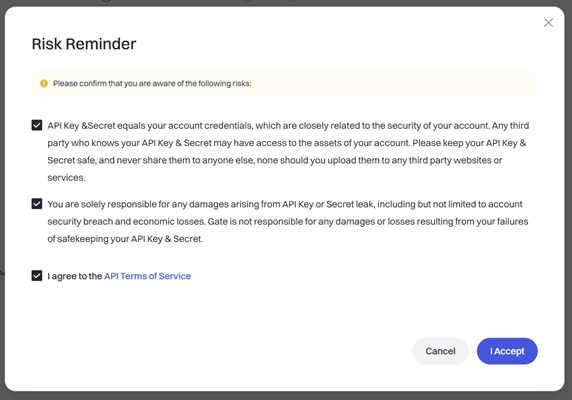
Step 2. Confirm the Gate.io Risk Reminder
Gate.io may show a Risk Reminder before creating the API key. Read the warning, check the required confirmation boxes, confirm the API Terms of Service, and click I Accept.
This step is normal when creating API credentials for automated trading. Do not skip the warning: the API key can send orders if trading permissions are enabled.
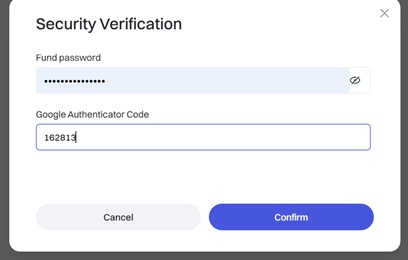
Step 3. Complete Security Verification
Enter your Fund Password and your Google Authenticator Code, then click Confirm.
If Gate.io rejects the verification, check that the Fund Password is correct and that your authenticator code is still valid.
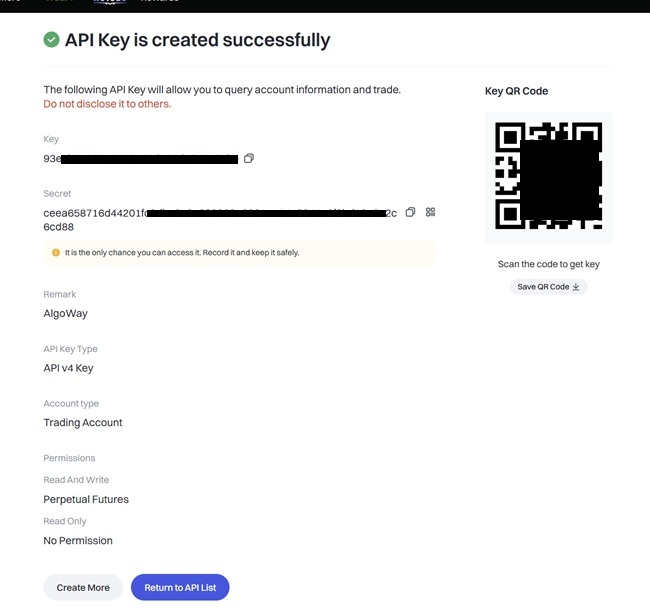
Step 4. Save the Gate.io API Key and Secret
After successful verification, Gate.io creates the API key. Copy the Key and Secret before leaving the page.
The secret may not be visible again after the window is closed. If you lose it, create a new API key and update the AlgoWay webhook settings.
Step 5. Create a Gate.io Webhook in AlgoWay
After the API key is ready, log in to AlgoWay and create a Gate.io webhook. This webhook is the bridge between TradingView alerts and Gate.io execution.
- Log in to your AlgoWay account.
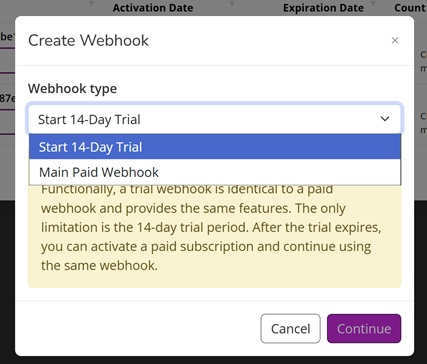
- Click Add Trial Webhook or Add Main Webhook.
- Select the webhook type:
- Start 14-Day Trial
- Main Paid Webhook
- Click Continue.
Step 6. Add Gate.io Credentials to AlgoWay
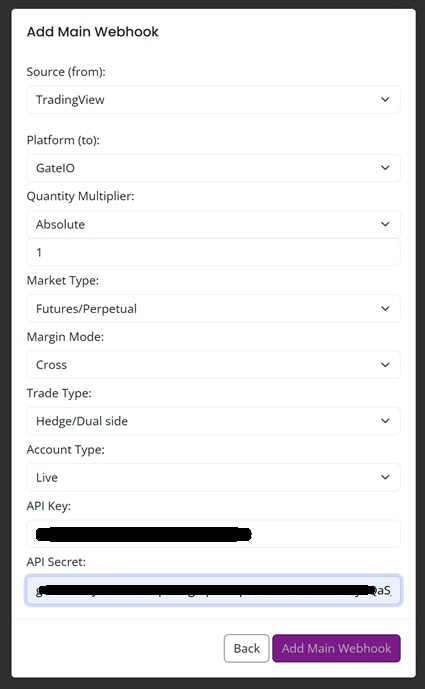
Fill in the Gate.io webhook form with your exchange settings and API credentials.
- Source: TradingView
- Platform: GateIO
- Quantity Multiplier: Absolute or the mode used by your strategy
- Market Type: Futures/Perpetual, if that is the selected route
- Margin Mode: Cross or Isolated
- Trade Type: Hedge/Dual side or the mode you use
- Account Type: Live, or the available account mode in your setup
- API Key: paste your Gate.io API Key
- API Secret: paste your Gate.io API Secret
Then click Add Trial Webhook or Add Main Webhook. After the webhook is created, AlgoWay will show it in the dashboard and logs section.
Step 7. Test the Gate.io Webhook Before Using TradingView
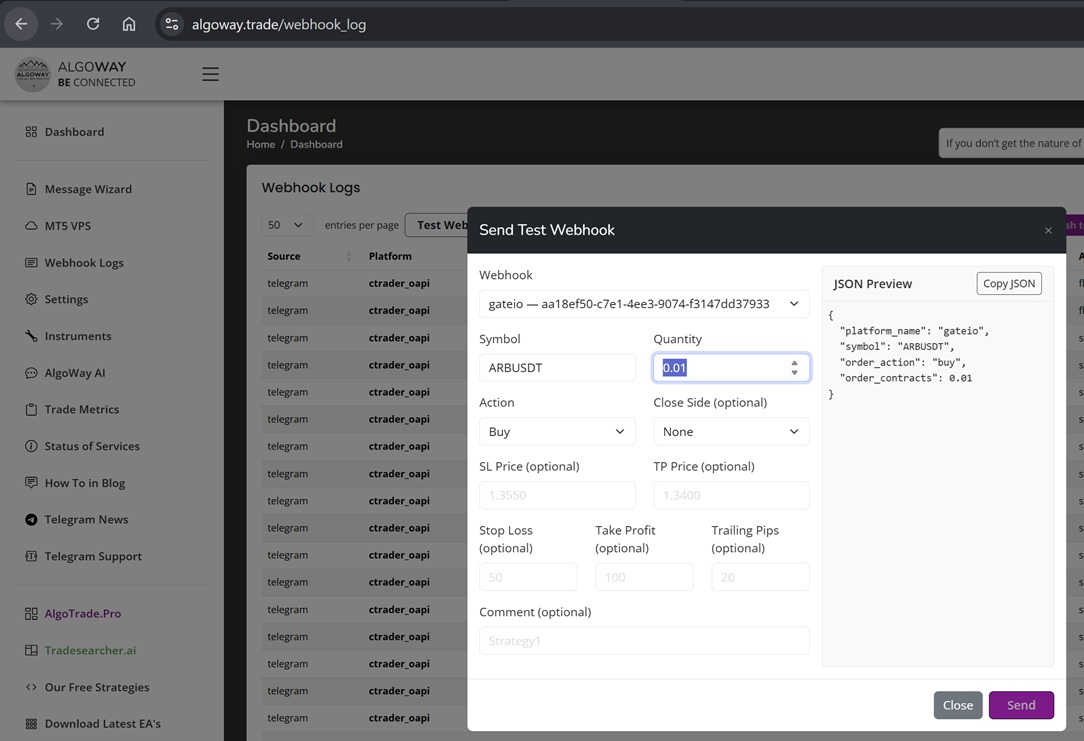
Before connecting a real TradingView alert, test the Gate.io webhook from AlgoWay. This confirms that the API key, permissions, market type, symbol, and order size are accepted.
- Open Webhook Logs in AlgoWay.
- Click Test Webhook.
- Select your Gate.io webhook.
- Enter a futures symbol such as
ARBUSDT. - Set quantity and action.
- Click Send.
Example Gate.io test JSON:
{
  "platform_name": "gateio",
  "ticker": "ARBUSDT",
  "order_action": "buy",
  "order_contracts": 0.01
}
If the test fails, check the API key permission, IP binding, market type, symbol format, quantity, and Gate.io response in the AlgoWay logs.
Step 8. Create a TradingView Strategy Alert for Gate.io
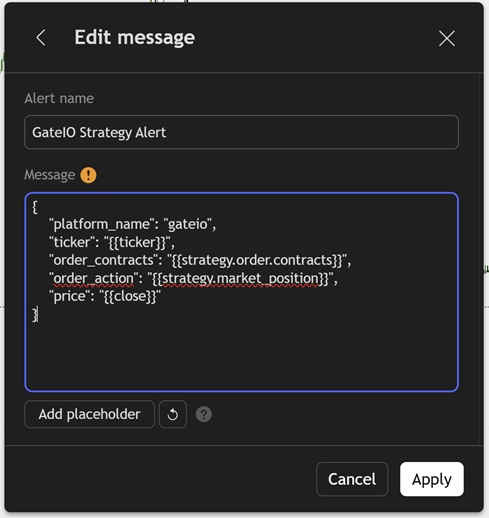
If you use a TradingView Strategy, paste a structured JSON message into the TradingView alert message box. AlgoWay expects valid JSON, not plain text.
Basic TradingView strategy alert JSON for Gate.io:
{
  "platform_name": "gateio",
  "ticker": "{{ticker}}",
  "order_contracts": "{{strategy.order.contracts}}",
  "order_action": "{{strategy.market_position}}",
  "price": "{{close}}"
}
TradingView replaces these placeholders with real values when the alert is triggered:
{{ticker}}— chart ticker;{{strategy.order.contracts}}— strategy order size;{{strategy.market_position}}— strategy position direction;{{close}}— current close price at alert time.
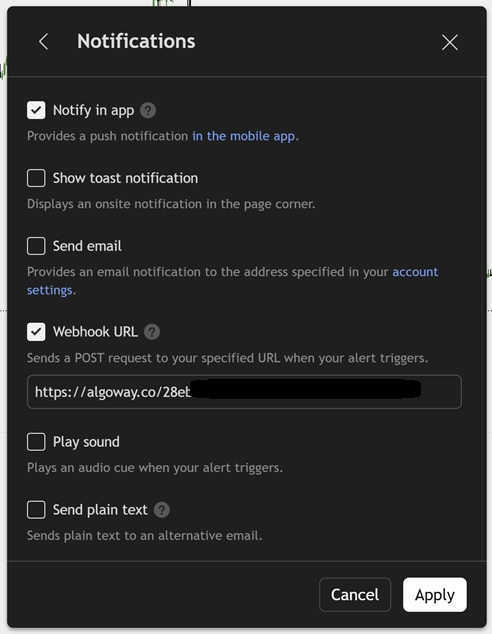
Step 9. Add the AlgoWay Webhook URL in TradingView
In the TradingView alert window, open the Notifications tab, enable Webhook URL, and paste your AlgoWay webhook link.
Your webhook URL will use the unique UUID from your AlgoWay webhook:
https://algoway.co/your-webhook-uuidClick Apply or Create to save the alert. When the alert fires, TradingView sends the message to AlgoWay and AlgoWay routes it to Gate.io.
Indicator Alerts and Manual TradingView Alerts
Strategy alerts are only one option. AlgoWay can also work with indicator alerts and manual alerts if the final message is valid AlgoWay JSON.
For indicator-based alerts, use the tools available inside the AlgoWay dashboard:
- Message Wizard: helps you build a valid AlgoWay webhook message manually.
- AlgoWay AI: helps convert a text signal into a structured AlgoWay JSON message.
This is useful when a TradingView indicator outputs custom text and you need to turn it into a Gate.io trading command.
Required JSON Fields for Gate.io Webhook Automation
A basic AlgoWay Gate.io webhook message usually includes these fields:
| Field | Example | Purpose |
|---|---|---|
platform_name |
gateio |
Tells AlgoWay to route the command to Gate.io. |
ticker |
ARBUSDT |
Defines the Gate.io symbol. |
order_contracts |
0.01 |
Defines the order quantity. |
order_action |
buy |
Defines the trade action. |
Additional fields depend on the AlgoWay configuration and the selected Gate.io market type. Test every new field before using live trading size.
Gate.io Futures, Perpetuals, and Spot Automation
Most Gate.io automation setups use futures or perpetual trading because webhook strategies often need long, short, flat, hedge, or dual-side logic.
Gate.io Futures and Perpetuals
For futures or perpetual automation, confirm that the API key has the required trading permission, the webhook uses the correct market type, and the symbol exists in the selected Gate.io market.
Gate.io Spot
Spot automation has different order and balance requirements. If you want to use Spot, confirm that the API permissions and AlgoWay webhook settings match Spot execution.
Do not assume that a symbol or quantity valid for one Gate.io market is automatically valid for another market.
Common Gate.io Webhook Problems
Fund Password Is Missing
If the Fund Password is not set, Gate.io may block API key creation. Create the Fund Password in account security settings first.
Wrong API Key Type
Use API v4 credentials for this setup. Old or wrong API key types can break exchange integration.
IP Binding Is Incorrect
If IP binding is enabled, the API key must allow the IP address required by AlgoWay. A wrong IP setting can cause authentication or permission errors.
Read And Write Permission Is Missing
Read-only keys cannot place trades. Enable the trading permissions required by your selected Gate.io route.
Invalid TradingView JSON
The TradingView alert message must be valid JSON. Use double quotes for strings and check commas, braces, and placeholders.
Wrong Symbol or Quantity
Gate.io can reject unsupported symbols, wrong market symbols, or quantities that do not match the exchange rules.
Why Use AlgoWay Instead of Building a Gate.io Trading Bot?
You can build your own TradingView to Gate.io trading bot. That requires a public webhook endpoint, server hosting, JSON validation, Gate.io API integration, order mapping, error handling, logs, and ongoing maintenance.
AlgoWay is designed for traders who want the automation route without managing that infrastructure. You create the webhook, add Gate.io credentials, paste the AlgoWay URL into TradingView, and monitor the result in AlgoWay logs.
This gives you:
- a no-code TradingView to Gate.io webhook bridge;
- structured JSON automation;
- support for crypto trading workflows through AlgoWay;
- dashboard-based testing before TradingView goes live;
- clear webhook logs;
- one automation system for multiple trading destinations.
Related AlgoWay Guides
These guides help complete the Gate.io automation workflow:
- How to create a webhook in TradingView
- TradingView webhook alerts and automation basics
- AlgoWay JSON schema for automated trading webhooks
- How to fix TradingView webhook Error 415
- How to connect TradingView to Binance with AlgoWay
- How to connect TradingView to Bybit with AlgoWay
Key Takeaway
To automate Gate.io from TradingView, you need a Gate.io API v4 key, the correct trading permissions, an AlgoWay Gate.io webhook, and a valid TradingView JSON alert message. Once these parts are configured, TradingView alerts can be routed to Gate.io through AlgoWay.
AlgoWay turns TradingView alerts into Gate.io webhook automation without forcing you to run your own crypto trading bot server.