AlgoWay Blog
Guides, manuals and platform references.
Core
- All articles
- FAQ
- PineConnector alternative
- TradersPost alternative
- Automate TradingView alerts
- Automate Telegram signals
- AlgoWay CopyTrader
- cTrader Copier
- TrendSpider with AlgoWay
- How to Automate a TradingView Indicator with Dynamic SL/TP and 1% Risk on MT5
JSON & Alerts
- JSON schema
- Manual alerts
- TradingView without paid subscription
- AlgoWay Strategy Integration in Pine Script
- Python Trading Bot Webhook Integration
- TRALADAL - TradingView Alert Adapter
- TradingView Order Action Alert
- How to use Clone Mode
MT5 / Expert Advisors
Errors
Integrations
- MetaTrader 5
- Tradovate
- TradeLocker
- cTrader
- Match-Trader
- DXtrade
- Capital.Com
- Binance
- Bybit
- MEXC
- OKX
- Bitget
- Hyperliquid
- BingX
- Alpaca
- Interactive Brokers
- Gate.io
- Coinbase
- TooBit
- WEEX
- ProjectX
- Rithmic
Other Publications
- MT5 EA Webhook JSON Reference
- OANDA MT5 with AlgoWay
- Buy Webhook via Buy Me a Coffee
- AlgoWay vs PineConnector
- Compare AlgoWay with other trading automation tools
- AlgoWay Red News Filter
- Why Paid Trading Indicators Avoid Verifiable Backtests
- How Trade Automation Tools Mislead You
- utomating a Prop-Firm Eval End to End:
- ATP Premium Indicator Testing Bot
- Why TradingView Backtests Win but Live Trades Lose
- Best Prop Firms for Trading Automation and Telegram Signal Copy in 2026
- Four AIs, One Trader, and the Strange Case of TradingView to Alpaca
- TradingView Automation
AlgoWay Strategy Lab
How to Connect TradingView Alerts to MEXC Futures with AlgoWay Webhook Automation
AlgoWay connects TradingView alerts to MEXC Futures through webhook automation. The full setup has five critical parts: create a dedicated MEXC API key, enable only the required Futures permissions, bind the API key to the AlgoWay server IP address, create a MEXC webhook in AlgoWay, and send valid JSON from TradingView to the AlgoWay webhook URL.
This guide describes the complete route shown in the screenshots: the MEXC API permission screen, the Link IP Address field, the created API key modal, the AlgoWay webhook form, the webhook test modal, the webhook UUID in the dashboard, and the TradingView alert configuration.
The execution route is:
TradingView alert → AlgoWay webhook URL → AlgoWay validation → MEXC Futures API → MEXC Perpetual Futures orderTradingView creates the signal. AlgoWay receives the webhook payload, validates the JSON, applies the selected webhook settings, signs the request with the MEXC API credentials, and sends the order request to MEXC Futures.
Last updated: 2026-05-17 • Author: AlgoWay
Quick Answer: TradingView to MEXC with AlgoWay
To automate MEXC Futures from TradingView with AlgoWay, complete this checklist:
- Create a dedicated MEXC API key for AlgoWay.
- Enable the required Futures permissions: order status access and order placement.
- Paste the AlgoWay server IP address into the MEXC Link IP Address field.
- Confirm that the created API key shows the same linked IP address.
- Copy the MEXC Access Key and Secret Key.
- Create a MEXC webhook in AlgoWay with Source set to TradingView and Platform set to MEXC.
- Choose Futures / Perpetual, margin mode, trade type and quantity multiplier in AlgoWay.
- Test the webhook with a small valid MEXC Futures order.
- Copy the AlgoWay webhook URL and paste it into TradingView.
- Paste valid JSON into the TradingView alert message.
Setup Route
AlgoWay works as the automation bridge between TradingView and MEXC:
- TradingView sends the alert and JSON message.
- AlgoWay receives the webhook, checks the payload, reads the webhook settings and signs the request.
- MEXC Futures receives the authenticated order request through the MEXC API key.
The API key is the authorization layer. The linked IP address is the server restriction layer. The webhook URL is the TradingView delivery endpoint. All three must match the same AlgoWay route.
Before You Start
Prepare the following before you create the MEXC API key:
- MEXC account with Futures / Perpetual trading available;
- AlgoWay account with access to the Webhooks dashboard;
- AlgoWay server IP address shown in the dashboard;
- TradingView chart, strategy, indicator or manual alert;
- TradingView plan with webhook alert support;
- small MEXC Futures test quantity;
- correct symbol format for your route;
- margin mode and position mode selected before live automation.
Step 1. Create a MEXC API Key
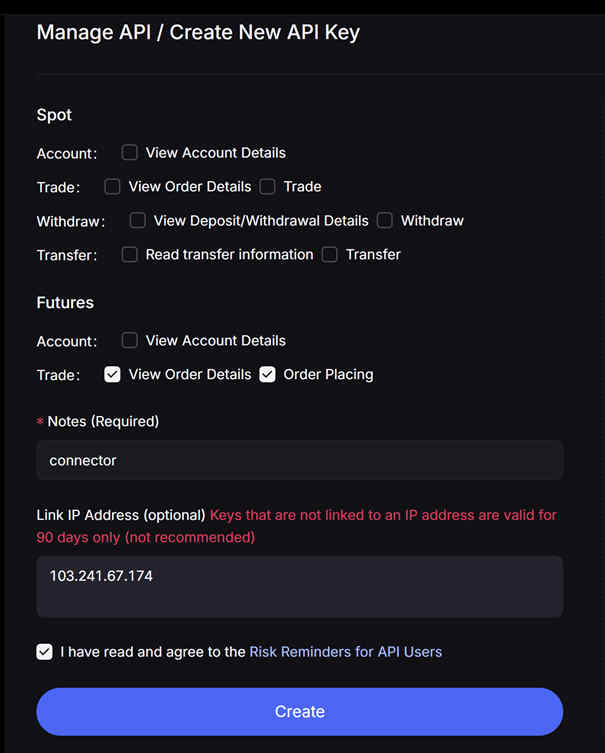
Open MEXC → API Management → Create New API Key. Use a dedicated API key for AlgoWay, not a shared key used by another bot or application.
On the MEXC screen, complete the API form from top to bottom:
- Leave unnecessary Spot permissions disabled for this Futures route.
- Go to the Futures permission area.
- Enable only the required Futures permissions.
- Enter a clear note, for example
connectororALGOWAY-MEXC. - Paste the AlgoWay server IP address into Link IP Address.
- Confirm the API risk reminder checkbox.
- Click Create.
Step 2. Bind the MEXC API Key to the AlgoWay Server IP
The Link IP Address field is one of the most important parts of the MEXC setup. This field restricts the API key so it can be used only from the server IP address entered in MEXC.
In the screenshot, the IP address is entered in the MEXC form before clicking Create. This means MEXC will link the API key to that server IP. For your setup, copy the current AlgoWay server IP from your AlgoWay dashboard and paste that exact value into MEXC.
Where the IP is entered in MEXC
In the MEXC API form, find this field:
Link IP AddressMEXC also shows a warning next to this field: keys that are not linked to an IP address are valid for 90 days only and are not recommended. For AlgoWay automation, do not leave this field empty.
IP binding checklist
- Open the AlgoWay dashboard.
- Copy the server IP shown for your webhook/account.
- Return to MEXC API Management.
- Paste the IP into Link IP Address.
- Check that there are no spaces before or after the IP.
- Confirm that the IP in MEXC matches the AlgoWay IP exactly.
- Create the key only after the IP field is filled.
What happens if the IP is wrong
If the Access Key and Secret Key are correct but the linked IP is wrong, AlgoWay can still receive the TradingView alert, but MEXC can reject the API request. In this case, the problem is not the TradingView JSON. Check the linked IP before changing the strategy or alert message.
Step 3. Select Futures API Permissions
For this MEXC Futures route, the API key must have Futures order permissions. The screenshot shows the relevant selections under the Futures section.
| Permission area | Permission | Use for this route? | Why it matters |
|---|---|---|---|
| Futures → Trade | View Order Details | Yes | Needed to check order state, exchange response and execution status. |
| Futures → Trade | Order Placing | Yes | Needed to create MEXC Futures orders through AlgoWay. |
| Futures → Account | View Account Details | Only if your route requires it | Can be used for account checks, but order placement itself depends on the trade permission. |
| Spot | Spot account or spot trade permissions | No for this Futures guide | This page describes MEXC Futures / Perpetual automation, not Spot automation. |
| Withdraw | Withdrawal-related permissions | No | Withdrawal access is not required for AlgoWay webhook trading. |
The screenshot shows Spot permissions disabled and Futures trade permissions enabled. This is the correct direction for a TradingView to MEXC Futures webhook route.
Step 4. Save Access Key, Secret Key and Linked IP
After MEXC creates the API key, it opens a confirmation window with three important fields:
- Access Key — the public key identifier used in AlgoWay as API Key.
- Secret Key — the private signing key used in AlgoWay as API Secret.
- Linked IP Address — the IP address attached to this MEXC API key.
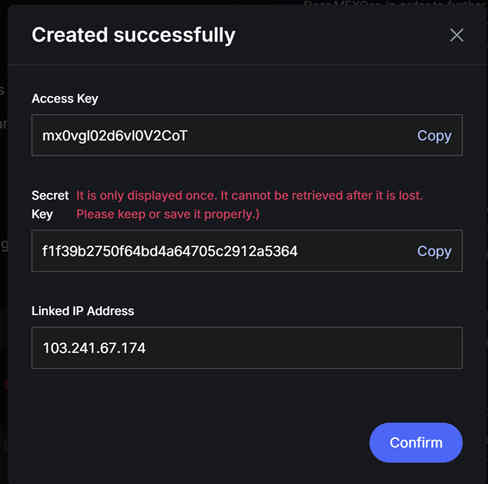
The Secret Key is displayed only once. Save it immediately before closing the MEXC confirmation window. Also check that the Linked IP Address field is not empty and contains the same AlgoWay server IP that you pasted during API key creation.
Step 5. Create the MEXC Webhook in AlgoWay
After the MEXC API key is created and the linked IP is confirmed, create the webhook route in AlgoWay.
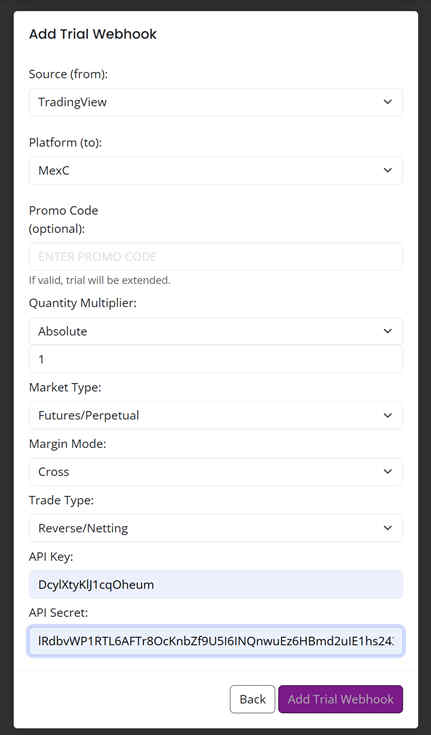
- Open the AlgoWay Dashboard.
- Click Add Trial Webhook or Add Main Webhook.
- Set Source (from) to TradingView.
- Set Platform (to) to MEXC.
- Choose the quantity multiplier mode.
- Set Market Type to Futures / Perpetual.
- Choose Cross or Isolated margin mode.
- Choose the trade type, for example Reverse / Netting or another supported mode.
- Paste the MEXC Access Key into API Key.
- Paste the MEXC Secret Key into API Secret.
- Save the webhook.
Main AlgoWay MEXC Fields
| AlgoWay field | Value for this route | Purpose |
|---|---|---|
| Source (from) | TradingView | Defines where the alert comes from. |
| Platform (to) | MEXC | Defines the destination exchange. |
| Quantity Multiplier | Absolute or selected route setting | Controls how AlgoWay interprets incoming order size. |
| Market Type | Futures / Perpetual | Matches the MEXC Futures route. |
| Margin Mode | Cross or Isolated | Controls the margin mode used by the route. |
| Trade Type | Reverse / Netting, Hedge or selected mode | Controls how AlgoWay handles direction changes and existing exposure. |
| API Key | MEXC Access Key | Identifies the MEXC API key. |
| API Secret | MEXC Secret Key | Signs authenticated MEXC API requests. |
Step 6. Test the MEXC Webhook in AlgoWay
Before connecting live TradingView alerts, test the MEXC route from AlgoWay with a small order.
- Open Webhook Logs in AlgoWay.
- Click Test Webhook.
- Select the MEXC webhook from the dropdown.
- Enter a valid MEXC Futures symbol for your route.
- Enter a small valid quantity.
- Select Buy or Sell.
- Use Close Side only when your trade mode requires it.
- Add optional SL / TP fields only if your route supports them.
- Check the JSON Preview before sending.
- Click Send.
- Check AlgoWay logs and the MEXC Futures account.
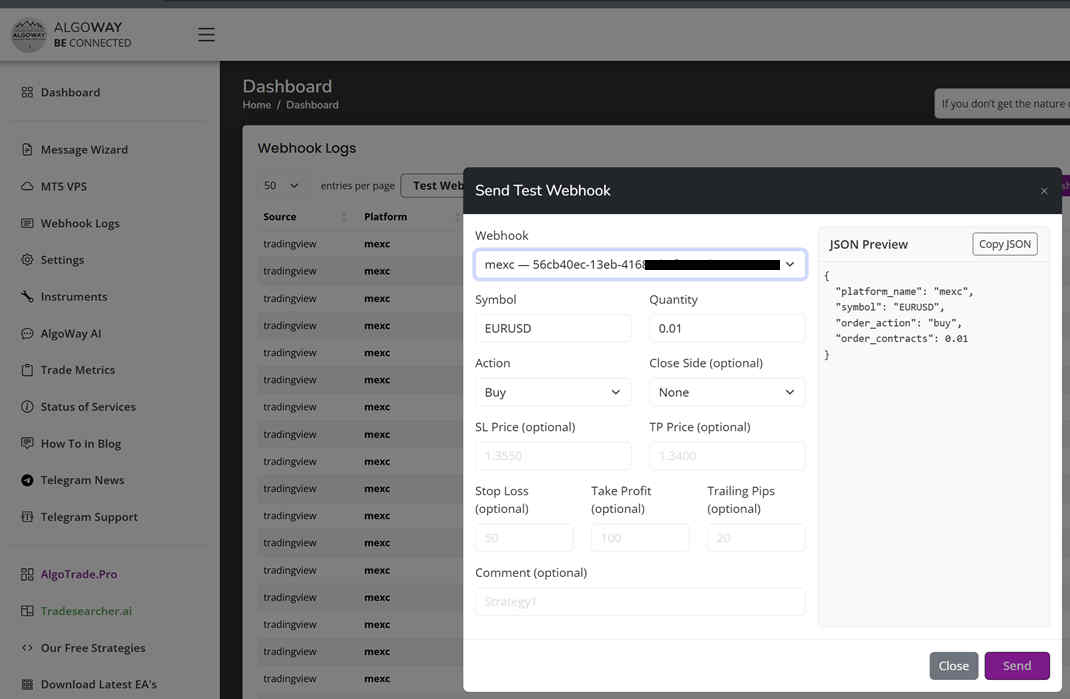
If the test fails, check the failure in this order: linked IP, Futures permissions, Access Key, Secret Key, symbol format, quantity step, margin mode, leverage, position mode and MEXC response in AlgoWay logs.
Step 7. Copy the AlgoWay Webhook URL
After the webhook is created and tested, copy the webhook endpoint from the AlgoWay dashboard.
- Open Dashboard → Your Webhooks.
- Find the row where Source is TradingView and Platform is MEXC.
- Copy the Webhook UUID or the full webhook URL.
- Use this URL in TradingView notifications.
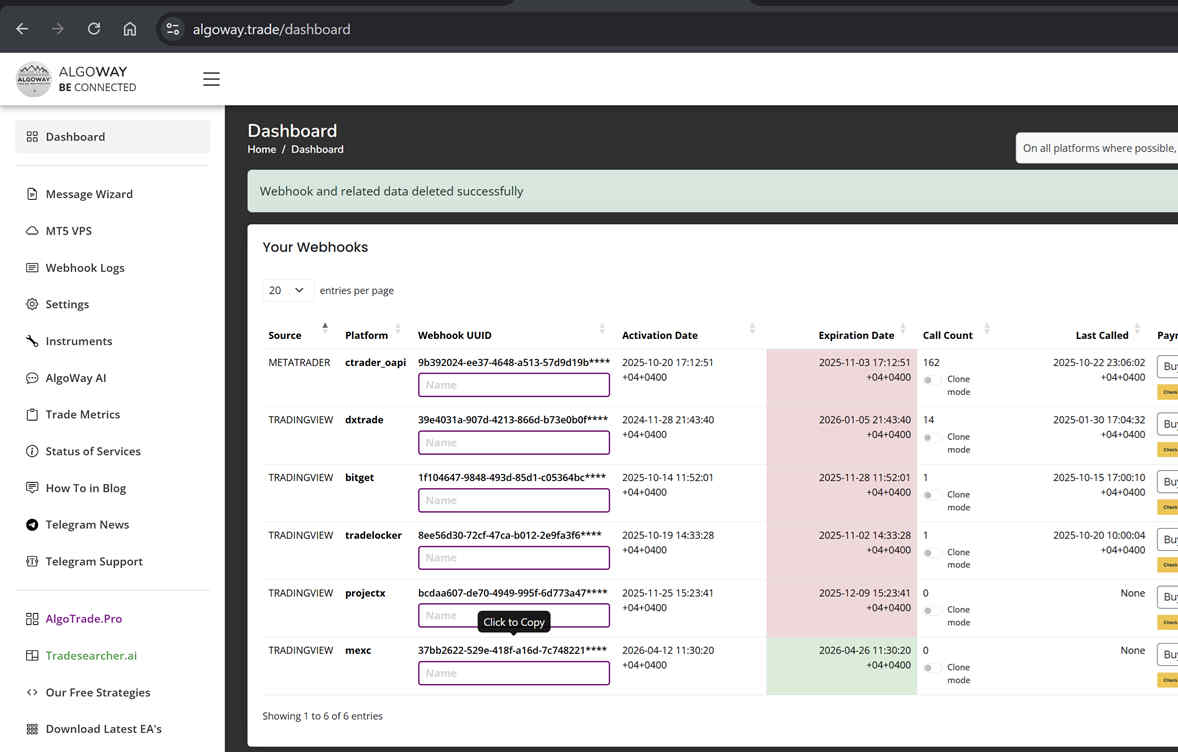
Webhook URL format:
https://algoway.co/your-webhook-uuidStep 8. Prepare TradingView JSON for MEXC
TradingView must send a valid JSON object. AlgoWay expects structured fields, not plain text.
Recommended TradingView strategy alert JSON
{
  "platform_name": "mexc",
  "ticker": "{{ticker}}",
  "order_contracts": "{{strategy.order.contracts}}",
  "order_action": "{{strategy.market_position}}",
  "price": "{{close}}"
}
TradingView replaces these placeholders when the alert fires:
{{ticker}}— chart ticker;{{strategy.order.contracts}}— strategy order size;{{strategy.market_position}}— strategy position state;{{close}}— close price at alert time.
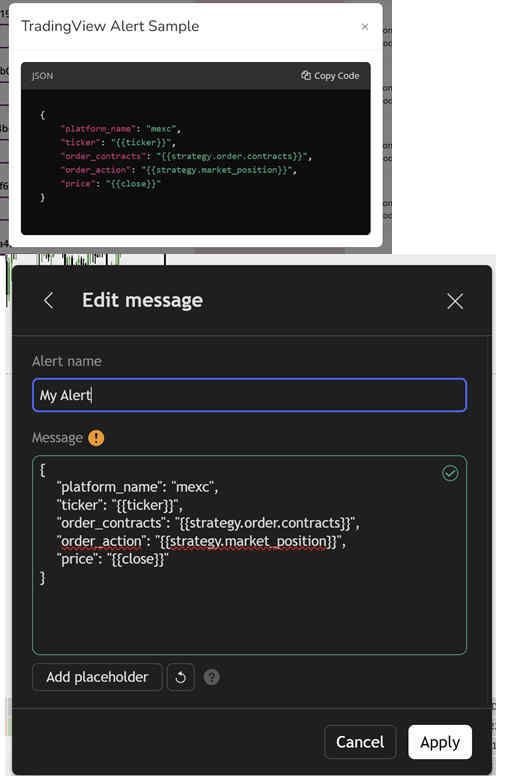
Fixed test JSON
For a controlled test, use a fixed symbol and small valid quantity:
{
  "platform_name": "mexc",
  "ticker": "BTCUSDT.P",
  "order_contracts": 0.001,
  "order_action": "buy"
}
Use the exact symbol format accepted by your MEXC Futures route. If the order is rejected, check symbol format, quantity step, margin, leverage, position mode and API permissions.
JSON with optional SL / TP fields
{
  "platform_name": "mexc",
  "ticker": "{{ticker}}",
  "order_contracts": "{{strategy.order.contracts}}",
  "order_action": "{{strategy.market_position}}",
  "price": "{{close}}",
  "stop_loss": "100",
  "take_profit": "200"
}
Confirm in your route how stop_loss and take_profit are interpreted before live trading. Depending on the route, these values may be treated as distance values, points or route-specific parameters.
Step 9. Create the TradingView Alert
After the webhook URL and JSON are ready, create or edit the TradingView alert.
- Open the TradingView chart used by your strategy.
- Create a new alert or edit an existing strategy alert.
- In the message area, paste the MEXC JSON.
- Open the alert Notifications section.
- Enable Webhook URL.
- Paste the AlgoWay MEXC webhook URL.
- Save the alert.
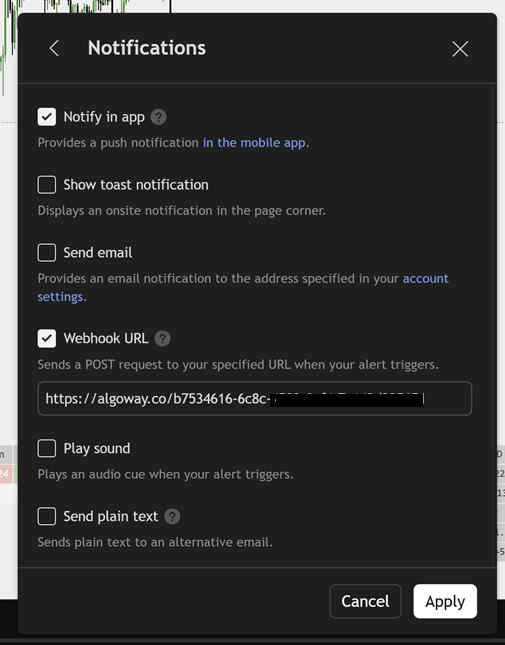
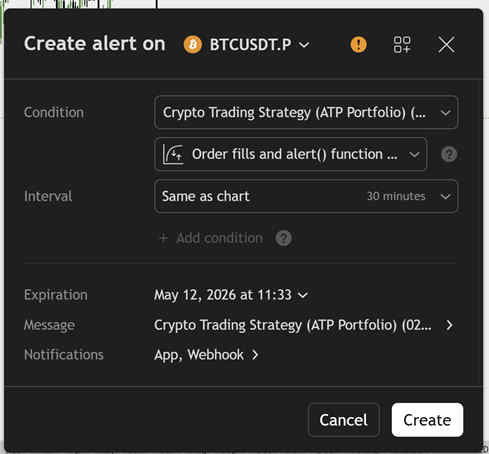
For bar-close strategies, use Once per bar close unless your strategy intentionally requires intra-bar execution. This prevents repeated intrabar webhook calls from the same candle.
Symbols, Quantity, Margin Mode and Trade Type
MEXC Futures automation depends on four execution settings: symbol, quantity, margin mode and trade type.
Symbol format
TradingView tickers and MEXC Futures symbols may use different formats. Before live trading, confirm the exact symbol accepted by your AlgoWay MEXC route. For example, a TradingView perpetual chart may show a suffix that must be mapped correctly before the MEXC API request is sent.
Quantity
The order size must satisfy MEXC Futures minimum quantity and step rules. A size that works on another exchange may be rejected by MEXC. Start with a small valid test quantity and check the exchange response in AlgoWay logs.
Margin mode
The margin mode selected in AlgoWay must match the position model you want to use. If account state, symbol settings or route configuration conflict with the requested margin mode, MEXC can reject the order.
Trade type
The AlgoWay Trade Type setting controls how opposite signals and open exposure are handled:
- Reverse / Netting: the newest signal controls the current direction.
- Hedge: long and short sides may be handled separately when supported.
- Close Side: used when the route must close only the long side or only the short side.
Full explanation: How AlgoWay handles opposite trading signals.
Verification and Logs
After the TradingView alert is created, trigger a small test and verify each layer:
- Confirm the alert fired in TradingView.
- Open AlgoWay Webhook Logs.
- Check that AlgoWay received the webhook payload.
- Check that the JSON fields are correct.
- Review the MEXC API response.
- Open MEXC Futures and confirm order or position status.
If no order appears in MEXC, do not immediately edit the TradingView strategy. First check whether AlgoWay received the webhook. If AlgoWay received it, check the linked IP, permissions, credentials, symbol, quantity, margin mode and exchange response.
Common MEXC Webhook Problems
Linked IP Address Is Missing
If the MEXC API key was created without the AlgoWay server IP in Link IP Address, the route is not ready for stable AlgoWay automation. Open MEXC API Management and confirm that the key has the correct linked IP.
Linked IP Address Is Wrong
If the linked IP belongs to another server or was copied incorrectly, MEXC can reject AlgoWay API requests even when the Access Key and Secret Key are correct. Compare the IP in MEXC with the current AlgoWay server IP shown in your dashboard.
Futures Order Permission Is Missing
If Order Placing is not enabled under Futures permissions, MEXC can reject order creation. Check the MEXC API permissions before changing the TradingView alert.
View Order Details Permission Is Missing
If order view permission is missing, status checks and response verification can fail. Enable the required Futures order detail permission for the webhook route.
Secret Key Was Not Saved
The Secret Key may only be displayed once. If it was not saved, create a new dedicated API key and update the MEXC credentials in AlgoWay.
Wrong Market Type
This guide is for MEXC Futures / Perpetual automation. Spot permissions and Futures permissions are separate. A Spot-only API key is not enough for this route.
Invalid JSON
TradingView must send one valid JSON object. Broken commas, missing quotes, invalid placeholders or plain text can stop the automation before MEXC receives anything. See: How to fix AlgoWay webhook Error 415.
Wrong Symbol Format
Check whether the TradingView ticker matches the symbol expected by the AlgoWay MEXC route and MEXC Futures API.
Invalid Quantity
The order size must satisfy MEXC Futures minimums and quantity steps. Use a small valid size for the first test.
Margin or Leverage Issue
If available margin is insufficient, leverage is incompatible, or margin mode conflicts with the account state, MEXC can reject the order.
TradingView Alert Fires Too Often
Check the TradingView alert frequency. For many strategy alerts, Once per bar close is safer than intrabar execution.
FAQ
Do I need to bind the MEXC API key to the AlgoWay IP?
Yes. For AlgoWay webhook automation, bind the MEXC API key to the AlgoWay server IP shown in your dashboard. The screenshot shows this in the MEXC Link IP Address field.
Where do I paste the AlgoWay server IP in MEXC?
Paste it into the Link IP Address field on the MEXC API key creation screen before clicking Create.
Which MEXC permissions are needed?
For this Futures route, use the required Futures trade permissions, including order details access and order placing. Do not enable withdrawal permissions.
What should I check first if MEXC rejects the request?
Check the linked IP first, then Futures permissions, Access Key, Secret Key, symbol format, quantity, margin mode, leverage and MEXC response in AlgoWay logs.
Can I use the same MEXC API key for several bots?
Use a dedicated key for the AlgoWay route. A dedicated key makes IP binding, permission control and troubleshooting clearer.
Related AlgoWay Guides
- How to create a TradingView webhook alert
- How to automate TradingView alerts to any broker with AlgoWay
- AlgoWay JSON schema guide
- How to fix AlgoWay webhook Error 415
- How to connect TradingView to Binance with AlgoWay
- How to connect TradingView to Bybit with AlgoWay
- How to connect TradingView to Bitget with AlgoWay
- How to connect TradingView to BingX with AlgoWay
- How to connect TradingView to Coinbase with AlgoWay
- How to copy TradingView alerts to multiple accounts
Final Summary
To connect TradingView alerts to MEXC Futures with AlgoWay, create a dedicated MEXC API key, enable only the required Futures permissions, bind the key to the AlgoWay server IP address, save the Access Key and Secret Key, create the MEXC webhook in AlgoWay, test the route, copy the webhook URL, and send valid JSON from TradingView.
The IP binding step is mandatory for a clean AlgoWay to MEXC setup. Without the correct linked server IP, webhook delivery can work in TradingView and AlgoWay while the final MEXC API request still fails.